Showing posts with label Tutorial. Show all posts

21 May 2008

What Are The Best Fonts for Making PowerPoint Presentation Slides

The fonts that you use in PowerPoint slides do play some role in making your presentations successful. The typeface should be readable and font size should be large enough so that people at the back have no problem reading the text.

Here’s some expert advice on selecting the right fonts (font family + size) for using in PowerPoint (or Keynote) presentations:

Guy Kawasaki: Guy says that your PowerPoint presentation slides should contain no font smaller than thirty points or just find out the age of the oldest person in your audience and divide it by two. That’s your optimal font size.

"Force yourself to use no font smaller than thirty points. I guarantee it will make your presentations better because it requires you to find the most salient points and to know how to explain them well."

Seth Godin: He recommends picking up a font other than Arial for presentations.

"Hire a pro, get a font you love and stick with it. Don’t change fonts over time (at least not often)… The right font becomes your handwriting."

Scott Hanselman: Scott, a great presenter and geek, recommends Lucida Console font, 14 to 18pt in bold for PowerPoint presentations.

"This [Lucida Console] is the most readable, mono-spaced font out there. Courier of any flavor or Arial (or any other proportionally spaced font) is NOT appropriate for code demonstrations, period, full stop. "

Garr Reynolds: The world’s best know presentation expert says that san-serif fonts are generally best for PowerPoint presentations, but try to avoid the ubiquitous Helvetica.

"Use the same font set throughout your entire slide presentation, and use no more than two complementary fonts (e.g., Arial and Arial Bold). Serif font are said to be easier to read at small point sizes, but for on screen presentations the serifs tend to get lost due to the relatively low resolution of projectors."

Convert PDF Documents to SWF Flash Movies Online with PDFMeNot

Like Scibd and SlideShare, PDFMeNot is an online PDF to Flash converter that will instantly convert any Adobe PDF document into a Macromedia Flash (SWF) movie while preserving the original layout, image graphics and formatting.

The PDF to SWF converter can very useful when you have to embed PDF files in web pages for inline viewing or you want to read PDF files on a computer that has no Acrobat Reader.

Here’s how to create Flash movies from PDF documents:

1. Go to PDFMeNot.com (Username: stateless Password: systems) and type the URL of the PDF file - you can use this PDF link as an example. Alternatively upload a PDF from the local hard drive.

2. In your Firefox menu bar, click Tools -> Page Info -> Media. Select the object that has an SWF extension (e.g. pdfmenot.com/store/f6a29535da98cd1.swf) and save it to your disk. That’s the SWF file created from your PDF document. For IE, here’s the trick to save Flash locally.

Bloggers can embed the following JS code in their web templates and PDF links will open in Flash SWF format via PDFMeNot.

While PDFMeNot is an extremely convenient option for quickly viewing PDF files in the browser without loading Adobe Reader, the downside is that the generated SWF objects contains Zoom but no Print and Search function. They are all supported in Macromedia Flash Paper format used by Scribd. Thanks Marshall.

Flash Video Editing Made Simple - Learn Everything about FLV Videos

Flash Video (flv) has become the default video format on the web and almost every video sharing site uses FLV to stream videos online. And its not just the YouTube clones, even media properties like CNN have switched to Adobe Flash Video.

Other than viewing Flash videos in your browser, some of download FLV files locally to enjoy web videos offline.

Everything You Wanted to Know about Editing FLV Flash Videos

Watching videos in an FLV player is half the fun - you can do so many other things like split FLV videos into multiple clips, trim the introductory part, convert flv videos to MP3 songs, extract image frames from the video, etc. Lets get started:

Q: How to Edit FLV Videos with expensive video editors ?

There are no standalone FLV editors around but if you have Adobe AIR, I highly recommend RichFLV - a lightweight flv editor that lets you do almost everything with FLV video clips.

edit-flv-youtube

With RichFLV, you can split flv files by adding cue-points, join two or more FLV video clips by stitching or add new MP3 sound tracks over your existing FLV video. Perfect if you want to edit YouTube videos on the computer.

Mac users have another good option - download Perian that turns Quick Time Pro into a FLV editor.

Q. How to convert FLV videos into MP3 audio files ?

extract-mp3-flv To extract audio from flv files, get the free FLV Extract utility from moitah.net - the video is saved as an MP3 file and the quality of sound in the original video is maintained as there’s no encoding done to save the audio.

Alternatively, you can extract MP3 from FLV files only using Vixy.net - an online service.

Q. Which media players can play Flash Videos on the desktop ?

To play FLV video files on the desktop, you can use Adobe Media Player, VLC Media Player or this standalone player which I think is the best flv player around for XP or Vista.

If you are on a Mac, you can play FLV videos downloaded from YouTube in your QuickTime player using the free Perian component discussed above.

Q. How to extract image frames from FLV Videos ?

You can export any image frame out of the FLV video using either the RichFLV editor or through VLC Media Player.

Open the .flv file in VLC, navigate to the frame that you want to save as an image and press Ctrl+Alt+S (or Video -> Snapshot). Note that the regular Print Screen key will not work for capturing screenshot from FLV file.

upload-flv-blip Q. Where can you upload FLV Video files on the web ?

Blip.TV - none of the other video sharing sites accept FLV format files.


Q. How to Embed FLV video clips in web pages ?

Read this guide on how to embed flv files in web pages. Alternatively, you could upload the file to Blip.TV and use the embed code provided by Blip.TV.

Q. How to Convert FLV videos to other video formats like WMV, AVI, etc ?

Use SUPER - the program may look complex at first glance but don’t worry, it’s very easy. I think it even lets you convert SWF movies into FLV videos.

Q. How to create new FLV movies files from scratch ?
VideoSpin is the only free video editing software I know of that can export movies into Flash Video format. An alternate trick is export your video into Windows Media or AVI and convert it into FLV using a converter program like SUPER .

22 March 2008

Create a Stop-Motion Animation Movie using Digital Camera or WebCam

Sometime back, I created a stop-motion animation film with the soft toys of my 2-year old son playing the lead roles. This 19 second movie was done using just a digital still camera (not video camcorder) and Windows Movie Maker, a free video editing software.

If the term "Stop Motion" is new for you, Wikipedia defines it as an animation technique which makes static objects appear to move. The object is moved by very small amounts between individual frames, producing the effect of motion when the film is played back.

To create a stop motion animation, you need a webcam or a basic digital camera (preferably mounted on a tripod for stability) and any video editing software (like Windows Movie Maker, Adobe Premiere Pro, Apple iMovie, etc)

Step 1: Fix your camera in front of the subjects (Mickey Mouse & Co. in my case). You can also your webcam mounted on the computer screen and capture still photographs using the keyboard.

Step 2: Visualize the movements and action of the characters in the movie (like what path they would follow, whether they would jump, etc). You may want to write this down as a rough movie script.

Step 3: Once your initial setting is in place, click the first picture. Now move the object(s) by a very small distance (few centimeters) and shoot the next picture. Make sure you don't change the position of your camera.

Repeat the step until all your characters reach the final frame.

Here's are some sample photographs shot for the movie embedded above - Notice how the elephant, dog and Mickey have moved in each of the frames while the bear is sitting still.


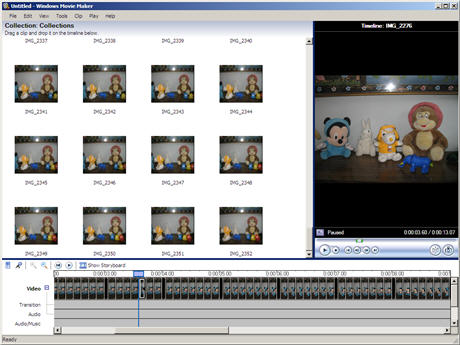
Step 4: Open Windows Movie Maker and goto Tools, Options and click the Advanced tab. Change the "Picture Duration" to 0.125 seconds and Transition Duration to 0.25 seconds (both are minimum values).

Now import all your digital photographs into Movie Maker and drag-n-drop them onto the Video Timeline. That's it. Export the video in AVI or WMV format and upload it to YouTube for sharing with your friends.

Bonus Tip: If you like your characters to jump in the stop-motion animation video, attach them to a thin wire and lift the wire a few centimeters in each frame. If the wire is of the same color as the background, it won't be visible in the final movie.

If you have professional video editing software like Adobe Premiere Pro or Apple Final Cut Pro, you can further reduce the time duration between still photographs to create smooth animation video without flickers or jerks.

Google

See other Related Posts below