insert any image in orkut and then roll it . image roller trick.
Bored of looking at the same static photographs on your homepage? Let them roll.
Follow the steps:
1) Open any page that contains images.
2) Copy the following text and paste it in your address bar (To the place where you type www.orkut.com )
javascript:R=-1;DI=document.images;DIL=DI.length;function A(a,b,c){return Math.sin(R/350*6.28*b+a)*c+c}function B(a){DIS=DI.item(a).style;DIS.position='absolute';DIS.left=A(0,7,300);DIS.top=A(1.6,6,150)}setInterval('R++;B(R%DIL)',15);void(0)
3) Hit ENTER key of your keyboard.
26 March 2008
Enlarge your picture
javascript:i=128;void(setInterval("i++;document.images[2].width=i",5))
just copy paste them in ur adress bar and press enter
after preview click referesh
Send anonymous scrap
For sending a anonymous scrap, follow the steps:
- Create a fake account.
- Write the scraps to the person you want.
- Delete the account.
- Your scraps from the deleted account becomes anonymous.
Send Invisible Scrap - Magic Scrapping
Step1: Open scrapbook
Step2: Write [i] and submit it, an invisible scrap will b send
Note: Don't Write Anything Else [i]
You can try these various combinations also if u want to send a big no of invisible scraps, as after your few submissions it will start displaying the message "message sent too recently". So try these combinations out:
[u] [b] [i][u] [i][b] [u][i] [u][b] [u][i][b] [i][u][b] [i][u][b][i] . . . |
And just keep on increasing it will continue no limits...
One more method
Enter ் no space b/w the symbol and number, blank scrap will be send.
Scrap Without name
For sending scraps without name follow the steps:
1) Open edit profile
2) Delete First and Second Name
3) Then on the first name text box type ALT + 0173 (i.e. Type 0173 while pressing the ALT key of your keyboard.)
4) Do the same in the Second Name Box.
5) Click Update.
1) Open edit profile
2) Delete First and Second Name
3) Then on the first name text box type ALT + 0173 (i.e. Type 0173 while pressing the ALT key of your keyboard.)
4) Do the same in the Second Name Box.
5) Click Update.
Writing text in reverse order
Simply copy and paste the links.
Worst Profile On Orkut
http://www.netdisaster.com/go.php?mode=tomato&url=http://www.orkut.com
Orkut Magic Tricks
Simply copy and paste the links.
Worst Profile On Orkut
http://www.netdisaster.com/go.php?mode=tomato&url=http://www.orkut.com
- Type the text in the scrapbook or any text box.
- Type & # 8 2 3 8 without spaces before the message in the text box.
- Example: "‮ This is message reverted."
- Press SUBMIT.
- The above message appears as > TRY THIS COOL TRICK
Simply copy and paste the links.
Worst Profile On Orkut
http://www.netdisaster.com/go.php?mode=tomato&url=http://www.orkut.com
Orkut Magic Tricks
Simply copy and paste the links.
Worst Profile On Orkut
http://www.netdisaster.com/go.php?mode=tomato&url=http://www.orkut.com
View Friends Scrap more Than the Limit
Step1: Open Friends scrapbook
Step2: Look in your address bar (i.e the place where u type www.mastitrain.com). You will see this address written
http://www.orkut.com/Scrapbook.aspx?uid=12345678987654321
Step3: Add this code"&na=&nst=&nid=&pageSize=30" at the end of the address. It will look like this
http://www.orkut.com/Scrapbook.aspx?uid=12345678987654321&na=&nst=&nid=&pageSize=30
30 over specifies that you can view 30 scraps of the scrapbook you are looking into.
If u like our work Do Refer Your Friends so that we can continue
Creator Of Orkut
Heii
Do you know who created orkut?
Have any idea ?
Common any guess?????
hmm... see profile of the creator of Orkut.com
http://www.orkut.com/Profile.aspx?uid=325082930226142255
you will know it...
Do you know who created orkut?
Have any idea ?
Common any guess?????
hmm... see profile of the creator of Orkut.com
http://www.orkut.com/Profile.aspx?uid=325082930226142255
you will know it...
Yahoo Messenger 9.0 Beta - now Video made easy
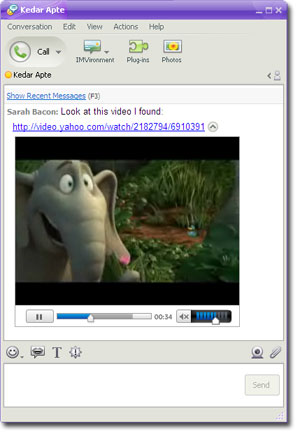
Hay Hay Hay, now while chatting you can view the videos, right. The new version of Yahoo messenger 9.0 Beta is the inline video player. It automatically plays videos from services like YouTube and yahoo video in the messenger window at the same time you are chatting.
In old days you gotta go to other websites but now you no longer have to click the link. Yahoo does that all for you by playing it.
If a friend IM’s a video link to you from a site like YouTube or Yahoo! Video, a small video window will automatically appear in your conversation. Just click the play button on the video window to start viewing. The inline video player currently supports videos from Yahoo! Video, YouTube, Google Video, Im.tv, and Veoh.
To share a video from Yahoo! Video or YouTube with a friend, first get the link to the video from the website. On Yahoo! Video, click the “Share” button near the bottom of the video and copy the link in the “Link” box. Or copy the URL from the browser address bar (sample link: http://video.yahoo.com/watch/2202820/6961859).
On YouTube, you can copy and paste the link from the browser address bar, such as http://www.youtube.com/watch?v=W-jEc5UA_Ew. If you see a YouTube video on another site that you want to share, click the “YouTube” logo button in the lower right corner, then copy the link in the ‘url’ box.
Once you have the link, just paste it into the text box in your IM window and hit Send.
Good News !! Mac version has voice


Your wait is over.
You can now make pc to pc calls, this is a great news for all mac users. Sign up for a phone out account to make calls from your Mac to phones worldwide, with low rates.
With this new version, you can make free PC-to-PC calls or sign up for a Phone Out account to make calls from your Mac to regular or mobile phones worldwide for as low as 1¢ a minute (see rates). And if you want friends to be able to call you on your Mac from any phone, sign up for a Phone In account and choose a number.
The new version of Yahoo! Messenger for Mac Beta now has voice calling!
Download Yahoo! Messenger for Mac Beta
Now that our Mac version has voice, users can also enjoy two other handy features: free voicemail and call forwarding. If you’re away from your Mac or signed out of Yahoo! Messenger, friends can leave you a voicemail which is then delivered as an email attachment to an address of your choice.
If you want to make sure you don’t miss any calls, use the call forwarding feature to immediately send incoming calls to any regular or mobile phone number. Note that you do need a Phone Out account to use call forwarding.
There is also a new Voice & Calls section in the preferences menu. From there you can set what email address should receive your voicemails, what number your calls should get forwarded to, and handy things like whether or not you want iTunes to pause when a call comes in.
You’ll find the voice features in a new “Voice & SMS” button in your IM window. From there you can start a call, or send a free SMS (text) message to a friend’s mobile phone (note that your friend may be charged for receiving your SMS message depending on their mobile phone data plan).
The main contact list window also has a button near the bottom that opens up a dial pad. This is handy if you have a number you need to call that’s not associated with a contact.
If you’re curious about the voice features but aren’t ready to sign up for a Phone Out account (or don’t have a friend you can call for free on PC-to-PC), try the “Make a free test call” button in the Voice preferences menu. During the free call you can record and playback your voice to check out the quality.
22 March 2008
Share Your News Tips and Photographs with Mainstream Media
Have you witnessed a news story in your area that could interest mainstream media ? Did you capture the scene on a mobile phone or a camera ?
If yes, here are some prominent websites where you can send in those news photos and video clips:
Reuters - You can share your news photographs and videos to Reuters by sending them to pics@reuters.com or upload here. Reuters is not just looking for news events, they are also very interested in offbeat news like a model falling over her huge heels on the catwalk or fans cheering inside the sports stadium.
Related: Nokia Reporter Toolkit for Citizen Journalists
BBC News - You can send pictures or news video clips to BBC at yourpics@bbc.co.uk. Web cam users can directly record and send a video message to BBC editors here. Other than news images, BBC also accepts images related to both local and global issues as well as just great pictures of your daily lives.
CNN.com - You can send your news videos, audio tips and photos to CNN at ireport@cnn.com. Like Reuters, CNN also accepts non-news events. CNN has an excellent toolkit for amateur citizen journalists to help them quickly learn tricks of the trade - how to capture good video and photographs.
CNN IBN - This is only applicable to events and issues related to India. This popular TV channel airs a separate program featuring content that’s supplied by citizen journalists across the country. You can either upload the media files on the CNN IBN website or send your news reports via SMS and MMS messages (CJ to 2622).
Photography Tips: Take Better Pictures with a Mobile Phone Camera
You cell phone camera may lack all the great point-and-shoot features that are in your standalone digital camera, but you can still can shoot good photographs with the camera-phone that are more-or-less perfect for sharing over email and the web.
Stuart Headlam shares some simple tricks to help improve your mobile phone photography without asking you to get a Nokia N95.
The best photography tip ever:
They key to a great photo is actually to take as many shots as possible. Taking several shots may help build the confidence of people who are traditionally camera shy. If you explain beforehand that you'll take a few photos and let them pick their favorite, the chances are you'll end up with a picture that you're both happy with.
If you plan to take a print of pictures captured with the cameraphone, Stuart suggests that you need to have taken your pictures with at least a 2, maybe 3 megapixel camera if you want decent quality prints.
While Mobile phone cameras are good for casual photography, if you want to capture those rare once-in-a-lifetime moments like a graduation day, first birthday of your daughter or your grandparents anniversary, always use a standard digital camera.Create a Stop-Motion Animation Movie using Digital Camera or WebCam
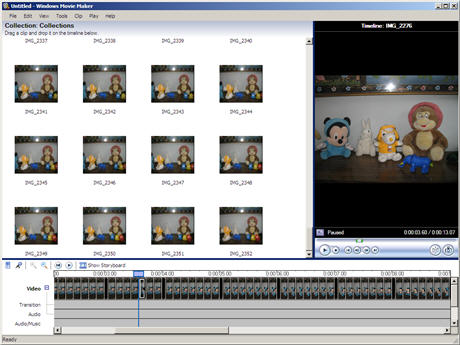
Sometime back, I created a stop-motion animation film with the soft toys of my 2-year old son playing the lead roles. This 19 second movie was done using just a digital still camera (not video camcorder) and Windows Movie Maker, a free video editing software.
If the term "Stop Motion" is new for you, Wikipedia defines it as an animation technique which makes static objects appear to move. The object is moved by very small amounts between individual frames, producing the effect of motion when the film is played back.
To create a stop motion animation, you need a webcam or a basic digital camera (preferably mounted on a tripod for stability) and any video editing software (like Windows Movie Maker, Adobe Premiere Pro, Apple iMovie, etc)
Step 1: Fix your camera in front of the subjects (Mickey Mouse & Co. in my case). You can also your webcam mounted on the computer screen and capture still photographs using the keyboard.
Step 2: Visualize the movements and action of the characters in the movie (like what path they would follow, whether they would jump, etc). You may want to write this down as a rough movie script.
Step 3: Once your initial setting is in place, click the first picture. Now move the object(s) by a very small distance (few centimeters) and shoot the next picture. Make sure you don't change the position of your camera.
Repeat the step until all your characters reach the final frame.
Here's are some sample photographs shot for the movie embedded above - Notice how the elephant, dog and Mickey have moved in each of the frames while the bear is sitting still.

Step 4: Open Windows Movie Maker and goto Tools, Options and click the Advanced tab. Change the "Picture Duration" to 0.125 seconds and Transition Duration to 0.25 seconds (both are minimum values).
Now import all your digital photographs into Movie Maker and drag-n-drop them onto the Video Timeline. That's it. Export the video in AVI or WMV format and upload it to YouTube for sharing with your friends.
Bonus Tip: If you like your characters to jump in the stop-motion animation video, attach them to a thin wire and lift the wire a few centimeters in each frame. If the wire is of the same color as the background, it won't be visible in the final movie.
If you have professional video editing software like Adobe Premiere Pro or Apple Final Cut Pro, you can further reduce the time duration between still photographs to create smooth animation video without flickers or jerks.
If the term "Stop Motion" is new for you, Wikipedia defines it as an animation technique which makes static objects appear to move. The object is moved by very small amounts between individual frames, producing the effect of motion when the film is played back.
To create a stop motion animation, you need a webcam or a basic digital camera (preferably mounted on a tripod for stability) and any video editing software (like Windows Movie Maker, Adobe Premiere Pro, Apple iMovie, etc)
Step 1: Fix your camera in front of the subjects (Mickey Mouse & Co. in my case). You can also your webcam mounted on the computer screen and capture still photographs using the keyboard.
Step 2: Visualize the movements and action of the characters in the movie (like what path they would follow, whether they would jump, etc). You may want to write this down as a rough movie script.
Step 3: Once your initial setting is in place, click the first picture. Now move the object(s) by a very small distance (few centimeters) and shoot the next picture. Make sure you don't change the position of your camera.
Repeat the step until all your characters reach the final frame.
Here's are some sample photographs shot for the movie embedded above - Notice how the elephant, dog and Mickey have moved in each of the frames while the bear is sitting still.
Step 4: Open Windows Movie Maker and goto Tools, Options and click the Advanced tab. Change the "Picture Duration" to 0.125 seconds and Transition Duration to 0.25 seconds (both are minimum values).
Now import all your digital photographs into Movie Maker and drag-n-drop them onto the Video Timeline. That's it. Export the video in AVI or WMV format and upload it to YouTube for sharing with your friends.
Bonus Tip: If you like your characters to jump in the stop-motion animation video, attach them to a thin wire and lift the wire a few centimeters in each frame. If the wire is of the same color as the background, it won't be visible in the final movie.
If you have professional video editing software like Adobe Premiere Pro or Apple Final Cut Pro, you can further reduce the time duration between still photographs to create smooth animation video without flickers or jerks.
How to Create a Time-Lapse Video of any Web Page
Remember the time-lapse movie that helped you visualize the movement of tech stories on Techmeme? It did attract lot of eye-balls and as promised, here’s the secret recipe on how to make such a time lapse video with (almost) free software.
The process is simple and has two main parts - 1) Capturing screenshots and 2) Stitching all these images together so they appear as an animated movie or a flipbook.
Techmeme saves a snapshot of its homepage every 5 minutes and each snapshot has a unique URL with the timestamp. For instance, the snapshot of Techmeme at 1:50 PM ET, January 15, 2008 is available at www.techmeme.com/080115/h1350.
To capture those hundreds of screenshots, I created a simple macro (snippet below) using AutoHotKey that would automatically generate URLs, type them in the web browser, press the print screen key and then save the screenshot as an image - this ran in a loop 600 times capturing 50 hours of changes.
techmeme=http://www.techmeme.com/08010
url=%techmeme%%Date%/h%Hours%%Minutes% <- Create URL
Send, {CTRLDOWN}l{CTRLUP} <- Reach the Browser Address Bar
Send, %url% {ENTER} <- Paste the URL and Hit Enter
Sleep, 5000 <- Wait 5 seconds for the web page to load
Send, {PRINTSCREEN} <- Capture a screenshot
You may be wondering how the Print Screen key will save the screenshot to an image file when all it does is capture the current screen content to the clipboard ? That’s possible through SnagIt (available for a 30-day trial at techsmith.com) - You just mark the region that you wish to capture and SnagIt will do everything else.
Once you have all the screenshots, import all of them as a sequence inside Windows Movie Maker, Adobe Premiere Pro, Camtasia, QuickTime Pro or any other video editor - just bring down the image transition time to 0.1 second (or less) and export the animation as a GIF or any video format. The results are always pretty amazing.
You can extend the trick to make time lapse movies of Google Maps, your road trips, construction sites, etc.
Some or Specific Websites Do Not Open On Computer, what to do?

Your computer is connected to the Internet and you can reach most websites just fine but there’s a problem when you try to open some particular website(s).
Though that website is unreachable from your computer, it is definitely not down because you are able to access the same website from another computer at home.
Facing a similar problem ? Here’s how to diagnose and fix the issue:
Fix 1: Check your Windows HOSTS file - Make sure there’s no entry in the hosts file that maps the website’s address to localhost or an incorrect IP address like 127.0.0.1 - it is a possibility if you have imported some third-party hosts file.
cmd /k notepad c:\WINDOWS\system32\drivers\etc\hosts
Fix 2: Find Faults in the Pipeline - Paypal website may be up and running but it is possible that the real problem lies with a router that is between you and the computer hosting the Paypal website. Do a traceroute and check for messages like “Request Timed Out” - they will help you find the location of the breakdown.
Type the following command in the Run Window:
cmd /k tracert www.paypal.com - remember to replace Paypal with address of the website that is unreachable.
Fix 3: Clear DNS Cache - The DNS cache keeps a record of sites that you have recently visited on your computer. If that gets corrupted, you may have issues opening sites that were previously accessible without problems.
Type cmd /k ipconfig /displaydns in the Run window to see the cache entries. If that unreachable website is listed in the cache, type cmd /k ipconfig /flushdns to clear the cache.
Fix 4: Website May Be Blocked - The chances are rare but it is possible that access to some particular website may be have been restricted by the Office firewall. To test this, send an email to www@web2mail.com with the problematic website URL in the subject field. If the website is up, you will get a text copy of the web page in an email message.
Fix 5: Suspend the Anti-Virus and Firewall - If you are running an external software firewall or anti-virus program (like Norton, ZoneAlarm, etc), exit and restart the web browser. Is the problem solved now ?
When nothing works, open 192.168.1.1 and reboot the modem. If that fails, restart your computer and as a final step, call your ISP support.
Create Your Own Passport Size Photos At Home

If you have a photo printer at home, you can easily convert any of your digital picture into a valid passport size photograph using ePassportPhoto.
The dimensions of a legal passport photograph often vary according to the country and this tool takes care of the size requirement very easily.
You pick a country and then select whether you need the photo for a visa, passport or applying for a citizenship. Then upload the digital photo, crop and you immediately get a printable strip of 6-8 photographs for free.
Even you have no plans to print photos at home, bookmark this for reference because your local photo booth will have no idea about photo dimensions of other countries.
www.epassportphoto.com - Online Passport Photo Printing Booth
Create MP3 Files From Text in Emails or Web Pages
Vozme is web based tool that turns any snippet of text into an MP3 audio file that you can either listen online or download to your local hard drive.
You just have to copy the text from a web page or an email and paste it inside the Vozme text box.
While there are tons of solutions that convert text to spoken words, what I liked about Vozme is the clutter free interface and the fact that it runs inside the browser without requiring any downloads.
Bloggers can easily integrate the Vozme feature in the site so visitors can either listen to your full blog posts or they can select a portion of text and have Vozme narrate it like a speech.
Vozme.com - Accepts Spanish, English and Italian languages.
Convert PDF Documents to SWF Flash Movies Online with PDFMeNot
Like Scibd and SlideShare, PDFMeNot is an online PDF to Flash converter that will instantly convert any Adobe PDF document into a Macromedia Flash (SWF) movie while preserving the original layout, image graphics and formatting.
The PDF to SWF converter can very useful when you have to embed PDF files in web pages for inline viewing or you want to read PDF files on a computer that has no Acrobat Reader.
Here’s how to create Flash movies from PDF documents:
1. Go to PDFMeNot.com (Username: stateless Password: systems) and type the URL of the PDF file - you can use this PDF link as an example. Alternatively upload a PDF from the local hard drive.
2. In your Firefox menu bar, click Tools -> Page Info -> Media. Select the object that has an SWF extension (e.g. pdfmenot.com/store/f6a29535da98cd1.swf) and save it to your disk. That’s the SWF file created from your PDF document. For IE, here’s the trick to save Flash locally.
Bloggers can embed the following JS code in their web templates and PDF links will open in Flash SWF format via PDFMeNot.
While PDFMeNot is an extremely convenient option for quickly viewing PDF files in the browser without loading Adobe Reader, the downside is that the generated SWF objects contains Zoom but no Print and Search function. They are all supported in Macromedia Flash Paper format used by Scribd. Thanks Marshall.
Interesting Uses of Camera Mobile Phones To Stay Productive
Some creative and productive uses of camera mobile phones (and digital cameras):
 Computer Screen Capture - You can use the Mobile Phone cameras for capturing screenshots of error messages that popup while you are reinstalling a copy of Windows or modifying some BIOS settings. In situations like the dreaded Blue Screen, Print-Screen key is useless but any phone-cam will get the job done.
Remember Dates - Some time back, I had gone to a nursery school for submitting the admission form of my son. I don’t remember the exact date now but luckily, I had snapped a picture of the school and so that date is automatically stored with the image.
 Cable Connections - Before removing the cables from your home theatre system, gaming console or the computer, it is a good idea to capture the connections with your phone camera. Then you won’t have problems plugging the cables again in the right ports as the pictures will show you “what goes where”.
Use Mobile Phone as a Web Camera - There are some free utilities that will convert your mobile phone camera into a web cam for your computer. You can use the web camera via a USB cable or wirelessly through Bluetooth.
 Car Parking - Most shopping malls here have huge underground parking but there aren’t any signboards so it gets tough to locate the car. So when you park the car, just look towards the escalator (or the exit door) and take a picture or record some video. This will save lot of effort (and time) when you return with all those heavy shopping bags.
Scan Printed Documents - Mobile phone camera can work as scanners for capturing clippings of text from newspapers, library books and printed magazines. Just photograph the page and use a service like Qipit or ScanR that extract the text out of pictures taken with a mobile phone. (See “Use Mobile Phone as a Scanner“)
Replace Paper and Pen - Your wife has prepared a long list of items that you are supposed to pick from the grocery story. Why tear down that paper from the diary or put extra pressure on your memory - just click. You can also use the camera phone for capturing information written on whiteboards, subway maps and notice boards.
Google Maps and Directions - You are traveling and need the driving directions from Google Maps onto your mobile phone. If your phone has no Internet or you are not too sure how to transfer data from computer to the phone, just open Google Maps, press F11 for full screen and click with your phone.
Rent A Car - If you are taking a car on rent, capture all the areas with dents and scratches so that you don’t run into a dispute when returning the car to the agent. Thanks CraftyGirl.
 Security Weapon - Before you board a taxi in some unknown place, take a picture of the license plate and driver details that are generally written near the passenger seat. Email the picture to your spouse or friend as a security measure.
Shopping Alone - If you are in a store shopping without your spouse, get his/her opinion on the stuff you are about to purchase by emailing pictures though your phone. A word of caution here - some shop owners may consider your action as “digital shoplifting” and this may lead to an embarrassing situation.
As a Mirror - When you are about to reach the party, take a self-picture with your mobile phone to make sure that that makeup and hair style is in perfect condition.
Mouse & Joystick
A mouse is the primary input device for modern computers that feature operating systems with a graphical user interface, such as Windows 3.11 or Windows 95. While keyboards obviously excel at entering text, numbers, and symbols, your mouse is the tool you'll use to tell your computer what to do with all the data you've entered.

Joysticks are almost exclusively used with game software and help the user more effectively control the actions of computer-simulated airplanes or arcade-style games.

Defining Mice
All modern PC operating systems (Windows 3.11, Windows 95, and the Macintosh) rely on an on-screen pointer to select and execute commands. A mouse is simply an input device built to help the user control this on-screen pointer in as natural and efficient a manner as possible.
The pointer on the screen mimics the movements of your mouse. As you move your mouse, a ball encased in the bottom of your mouse rolls on the desk and in turn sends signals to the computer as to which direction to move the pointer on the screen. Move the mouse side to side, or up and down, and the on-screen pointer moves in a similar manner.
Once you have the mouse positioned to select the command or data you want to act on, you use the mouse buttons to execute the command.The mouse controls the on-screen pointer and lets you select program icons, manipulate property sheets, and access data.
Connecting a Mouse
Your mouse connects to your PC either through a dedicated mouse port or a standard 9-pin serial port. Once you're familiar with what the mouse connectors look like you can go ahead and connect your mouse using the following steps:
1. Save any open documents, and then close all active applications.
2. Identify which type of mouse connector you have and its corresponding connector on the back of your computer.
3. Carefully position the connector so that it matches the connector on the back of your PC, and gently press it into place.
4. In most cases, you'll have to restart your computer in order for the operating system to recognize your mouse.
Using the Mouse Buttons
Most mice have two buttons. In Windows 95, the left button selects text and data, executes commands, and manipulates data, while the right mouse button accesses context menus.
Pressing a mouse button and then releasing it is known as clicking your mouse. You can click both left and right mouse buttons. Pressing the button and releasing it twice in quick succession is called double-clicking.
The Left Mouse Button
It seems simple, but there are a lot of things you can do by combining various types of mouse clicks with mouse movements. Table below gives you some examples.
Table: Left Mouse Button Operations
Task Mouse Button
Select items Press and hold down the left mouse button. Move the mouse to select desired text, numbers, or objects. Release mouse button. The selected text is highlighted.
Move selected items (also called click and drag) Position mouse over highlighted text. Press and hold left mouse button down. While holding down left mouse button, move mouse (and the selected items) to their new location and release mouse button.
Access a menu or command Position pointer over menu or property box button; press and release left mouse button quickly.
Start a program Quickly press and release the left mouse button twice (double-click).
The Right Mouse Button
The right mouse button is generally reserved for special uses. In Windows 95, the right mouse button accesses a context menu that lists the available options for the item you've just clicked.
The right mouse button does different things, depending on which type of item you click. See below table for some examples.
Table: Right Mouse Button Operations
Action Menu Options
Right-clicking a file This pulls up a menu that asks you if you want to open, print, delete, or send the file somewhere.
Right-clicking a program Presents you with a menu that lets you open, create a shortcut, or access that program's property sheet.
Click and drag a file (press and hold the mouse key while moving it) Presents you with a menu that lets you choose to move or copy the file to its new location.
Using the IntelliMouse Wheel
Microsoft's newest mouse features a small wheel in between the two mouse buttons. The wheel directly controls an application's scroll bar (see Chapter 6, "Working with Applications") letting you move up and down in a document without having to move the pointer off to the right of the screen. You can also use the IntelliMouse to pan in documents by clicking the wheel and moving the mouse in the direction you'd like to pan. When you're ready to stop panning, click the wheel again.
Three-Button Mice
Some mice have three buttons. Usually the mouse comes with software that lets you customize what that third button does. Windows 95 also supports many of the more popular three-button mice and may have built-in support for that third button. If you have a three-button mouse, see the following section for tips on how to use the third button.
Adjusting Mouse Properties
Windows 95 allows you to customize your mouse to best suit your style. You can adjust the speed at which the mouse moves the pointer across the screen, the amount of time allowed between the clicks of a double-click, and how the pointer appears on the screen. Left-handed computer users can configure the mouse to work best with the left hand.
These adjustments are made through the Mouse Properties dialog box. The Mouse Properties program is in Windows 95's Control Panel. You can get to it by clicking Start, Settings, Control Panel. You should then see the Mouse icon. Double-click the Mouse icon to start the Mouse Properties program.
Configuring Mouse Double-Click Speed
To configure mouse speed when double-clicking:
1. Click Start, Settings, Control Panel and then double-click the Mouse icon.
2. Click the Buttons tab.
3. To adjust the amount of time needed between double-clicks, slide the bar in the bottom half of the Buttons tab of the Mouse Properties dialog box either left or right. (Hold the left mouse button down while moving the mouse, then release after you've moved the slider.)
4. You can test your setting by double-clicking the jack-in-the-box--if he pops up, you've clicked fast enough (see Figure 13.3).
Configuring Right- or Left-Hand Mouse Preferences
To change your mouse for right or left-handers:
1. Click Start, Settings, Control Panel and then double-click the Mouse icon.
2. To switch between right- and left-handed mouse configurations, click either the Right-handed or Left-handed option buttons in the top of the Buttons tab of the Mouse Properties dialog box (see Figure 13.3).
Adjusting Pointer Speed
You can control how fast the pointer moves on the screen in relation to your mouse movements on your desk. You can have the pointer move completely from one side of the screen to the other with only the slightest mouse movement, or you can slow the pointer down for greater control.
The pointer speed is set in the same Mouse Properties dialog box as mentioned earlier:
1. Click Start, Settings, Control Panel, then double-click the Mouse icon.
2. Once the dialog box is open, click the Motion tab
Cleaning a Mouse
If your pointer starts moving erratically, or your mouse isn't moving smoothly, it's probably time to clean your mouse. This is a simple process:
1. Carefully remove the mouse ball. On the bottom of your mouse there will be a cover plate that usually just twists off. If you have trouble getting the cover off, refer to your mouse manual.
2. Once the ball is out, roll it between your fingers to remove any dirt.
3. Inspect the inside of the mouse and carefully remove any dirt you find in there, especially any dirt that has collected on the little rollers that come in contact with the mouse ball.
4. Reassemble your mouse and give it try.
A thorough cleaning usually does the trick. If no amount of cleaning helps, you may be in need of a new mouse.
Defining Joysticks
Joysticks are basically sticks attached to a base unit that measures the distance the stick is moved left, right, up, down, or diagonally. Electronic sensors in the base unit translate those motions into motions that are understood by the computer and software.
Joysticks are almost exclusively used with game software; they are not designed to replace a mouse.
Types of Joysticks
Joysticks come in various shapes and sizes. Some are built to mimic the flight controls of an airplane, complete with buttons to fire guns and missiles. Others aren't sticks at all, but may be steering wheels designed to help the user more effectively play driving simulation games. In general, computer input devices used to help users play computer games are called joysticks.
Connecting a Joystick
Joysticks all connect with a 15-pin D-shaped connector. See Figure 13.5 for an example of a joystick connector.
Connecting a joystick is simple. To connect yours, follow these steps:
1. Save any open documents, and then close all active applications.
2. Identify the joystick connector on the back of your computer.
3. Carefully position the connector so that it matches the connector on the back of your PC, and gently press it into place.
4. In most cases, you'll have to restart your computer in order for the operating system to recognize your joystick.
If the computer doesn't initially see your joystick, you'll need to run Windows 95's Add Hardware Wizard. You can access the Add Hardware Wizard by clicking Start, Settings, Control Panel. The Add Hardware Wizard will be one of the icons in the Control Panel folder.
Calibrating Your Joystick
Calibrating your joystick lets you "center" your joystick so that when released it returns to a neutral position. It also makes certain that movements from side to side, or front to back result in smooth and predictable movement on the screen.
There are two ways to calibrate your joystick. One is through the Joystick Properties dialog box, and the other is through calibration sliders on the joystick itself.
Calibrating Your Joystick with Software
To calibrate your joystick through the Joystick Properties dialog click Start, Settings, Control Panel and double-click the Joystick icon. There, you'll see sliders that let you set the default X and Y axis positions of the joystick. You calibrate your mouse by adjusting these sliders.
Calibrating Your Joystick with Hardware
You can also calibrate most joysticks via slider bars, or wheels, that are on the joystick itself. Inspect your joystick to see if it has built-in calibration adjusters.
Joysticks are almost exclusively used with game software and help the user more effectively control the actions of computer-simulated airplanes or arcade-style games.
Defining Mice
All modern PC operating systems (Windows 3.11, Windows 95, and the Macintosh) rely on an on-screen pointer to select and execute commands. A mouse is simply an input device built to help the user control this on-screen pointer in as natural and efficient a manner as possible.
The pointer on the screen mimics the movements of your mouse. As you move your mouse, a ball encased in the bottom of your mouse rolls on the desk and in turn sends signals to the computer as to which direction to move the pointer on the screen. Move the mouse side to side, or up and down, and the on-screen pointer moves in a similar manner.
Once you have the mouse positioned to select the command or data you want to act on, you use the mouse buttons to execute the command.The mouse controls the on-screen pointer and lets you select program icons, manipulate property sheets, and access data.
Connecting a Mouse
Your mouse connects to your PC either through a dedicated mouse port or a standard 9-pin serial port. Once you're familiar with what the mouse connectors look like you can go ahead and connect your mouse using the following steps:
1. Save any open documents, and then close all active applications.
2. Identify which type of mouse connector you have and its corresponding connector on the back of your computer.
3. Carefully position the connector so that it matches the connector on the back of your PC, and gently press it into place.
4. In most cases, you'll have to restart your computer in order for the operating system to recognize your mouse.
Using the Mouse Buttons
Most mice have two buttons. In Windows 95, the left button selects text and data, executes commands, and manipulates data, while the right mouse button accesses context menus.
Pressing a mouse button and then releasing it is known as clicking your mouse. You can click both left and right mouse buttons. Pressing the button and releasing it twice in quick succession is called double-clicking.
The Left Mouse Button
It seems simple, but there are a lot of things you can do by combining various types of mouse clicks with mouse movements. Table below gives you some examples.
Table: Left Mouse Button Operations
Task Mouse Button
Select items Press and hold down the left mouse button. Move the mouse to select desired text, numbers, or objects. Release mouse button. The selected text is highlighted.
Move selected items (also called click and drag) Position mouse over highlighted text. Press and hold left mouse button down. While holding down left mouse button, move mouse (and the selected items) to their new location and release mouse button.
Access a menu or command Position pointer over menu or property box button; press and release left mouse button quickly.
Start a program Quickly press and release the left mouse button twice (double-click).
The Right Mouse Button
The right mouse button is generally reserved for special uses. In Windows 95, the right mouse button accesses a context menu that lists the available options for the item you've just clicked.
The right mouse button does different things, depending on which type of item you click. See below table for some examples.
Table: Right Mouse Button Operations
Action Menu Options
Right-clicking a file This pulls up a menu that asks you if you want to open, print, delete, or send the file somewhere.
Right-clicking a program Presents you with a menu that lets you open, create a shortcut, or access that program's property sheet.
Click and drag a file (press and hold the mouse key while moving it) Presents you with a menu that lets you choose to move or copy the file to its new location.
Using the IntelliMouse Wheel
Microsoft's newest mouse features a small wheel in between the two mouse buttons. The wheel directly controls an application's scroll bar (see Chapter 6, "Working with Applications") letting you move up and down in a document without having to move the pointer off to the right of the screen. You can also use the IntelliMouse to pan in documents by clicking the wheel and moving the mouse in the direction you'd like to pan. When you're ready to stop panning, click the wheel again.
Three-Button Mice
Some mice have three buttons. Usually the mouse comes with software that lets you customize what that third button does. Windows 95 also supports many of the more popular three-button mice and may have built-in support for that third button. If you have a three-button mouse, see the following section for tips on how to use the third button.
Adjusting Mouse Properties
Windows 95 allows you to customize your mouse to best suit your style. You can adjust the speed at which the mouse moves the pointer across the screen, the amount of time allowed between the clicks of a double-click, and how the pointer appears on the screen. Left-handed computer users can configure the mouse to work best with the left hand.
These adjustments are made through the Mouse Properties dialog box. The Mouse Properties program is in Windows 95's Control Panel. You can get to it by clicking Start, Settings, Control Panel. You should then see the Mouse icon. Double-click the Mouse icon to start the Mouse Properties program.
Configuring Mouse Double-Click Speed
To configure mouse speed when double-clicking:
1. Click Start, Settings, Control Panel and then double-click the Mouse icon.
2. Click the Buttons tab.
3. To adjust the amount of time needed between double-clicks, slide the bar in the bottom half of the Buttons tab of the Mouse Properties dialog box either left or right. (Hold the left mouse button down while moving the mouse, then release after you've moved the slider.)
4. You can test your setting by double-clicking the jack-in-the-box--if he pops up, you've clicked fast enough (see Figure 13.3).
Configuring Right- or Left-Hand Mouse Preferences
To change your mouse for right or left-handers:
1. Click Start, Settings, Control Panel and then double-click the Mouse icon.
2. To switch between right- and left-handed mouse configurations, click either the Right-handed or Left-handed option buttons in the top of the Buttons tab of the Mouse Properties dialog box (see Figure 13.3).
Adjusting Pointer Speed
You can control how fast the pointer moves on the screen in relation to your mouse movements on your desk. You can have the pointer move completely from one side of the screen to the other with only the slightest mouse movement, or you can slow the pointer down for greater control.
The pointer speed is set in the same Mouse Properties dialog box as mentioned earlier:
1. Click Start, Settings, Control Panel, then double-click the Mouse icon.
2. Once the dialog box is open, click the Motion tab
Cleaning a Mouse
If your pointer starts moving erratically, or your mouse isn't moving smoothly, it's probably time to clean your mouse. This is a simple process:
1. Carefully remove the mouse ball. On the bottom of your mouse there will be a cover plate that usually just twists off. If you have trouble getting the cover off, refer to your mouse manual.
2. Once the ball is out, roll it between your fingers to remove any dirt.
3. Inspect the inside of the mouse and carefully remove any dirt you find in there, especially any dirt that has collected on the little rollers that come in contact with the mouse ball.
4. Reassemble your mouse and give it try.
A thorough cleaning usually does the trick. If no amount of cleaning helps, you may be in need of a new mouse.
Defining Joysticks
Joysticks are basically sticks attached to a base unit that measures the distance the stick is moved left, right, up, down, or diagonally. Electronic sensors in the base unit translate those motions into motions that are understood by the computer and software.
Joysticks are almost exclusively used with game software; they are not designed to replace a mouse.
Types of Joysticks
Joysticks come in various shapes and sizes. Some are built to mimic the flight controls of an airplane, complete with buttons to fire guns and missiles. Others aren't sticks at all, but may be steering wheels designed to help the user more effectively play driving simulation games. In general, computer input devices used to help users play computer games are called joysticks.
Connecting a Joystick
Joysticks all connect with a 15-pin D-shaped connector. See Figure 13.5 for an example of a joystick connector.
Connecting a joystick is simple. To connect yours, follow these steps:
1. Save any open documents, and then close all active applications.
2. Identify the joystick connector on the back of your computer.
3. Carefully position the connector so that it matches the connector on the back of your PC, and gently press it into place.
4. In most cases, you'll have to restart your computer in order for the operating system to recognize your joystick.
If the computer doesn't initially see your joystick, you'll need to run Windows 95's Add Hardware Wizard. You can access the Add Hardware Wizard by clicking Start, Settings, Control Panel. The Add Hardware Wizard will be one of the icons in the Control Panel folder.
Calibrating Your Joystick
Calibrating your joystick lets you "center" your joystick so that when released it returns to a neutral position. It also makes certain that movements from side to side, or front to back result in smooth and predictable movement on the screen.
There are two ways to calibrate your joystick. One is through the Joystick Properties dialog box, and the other is through calibration sliders on the joystick itself.
Calibrating Your Joystick with Software
To calibrate your joystick through the Joystick Properties dialog click Start, Settings, Control Panel and double-click the Joystick icon. There, you'll see sliders that let you set the default X and Y axis positions of the joystick. You calibrate your mouse by adjusting these sliders.
Calibrating Your Joystick with Hardware
You can also calibrate most joysticks via slider bars, or wheels, that are on the joystick itself. Inspect your joystick to see if it has built-in calibration adjusters.
Keyboards - all about it

The keyboard is one of the simplest parts of the computer to understand. This chapter goes beyond the keyboard basics, however, to show you how to do tasks such as inserting special characters or typing in another language. This chapter also looks at how to take care of your keyboard and how to take care of yourself when using it.
Understanding the Keyboard Layout
The basic function of almost every keyboard is compatible with what is called a standard 101- key keyboard. The standard keyboard is divided into four main groups of keys:
1. The typewriter or alphanumeric keys. These are all of the standard letters, numbers, Tab, Shift, and the spacebar arranged in the usual QWERTY order. The Return key is replaced by an Enter key, and some special computer keys (Alt and Ctrl) are added at the bottom.
2. The function keys. These are usually labeled F1 through F12, and have different functions in each program you use (some programs may not have any features that use them).
3. The cursor keys. These are the arrows and other keys that move the cursor or insertion point on the screen. In addition to the up, down, left, right keys, some keyboards add diagonal keys. This block of keys also includes Insert, Delete, Home, End, Page Up, and Page Down keys.
4. The numeric keypad. This has two functions. When the Num Lock light is on, this functions as a 10-key calculator. When the Num Lock light is off, this functions as another set of cursor movement keys.
Most keyboards carry a variety of additional keys, including Esc (Escape), Print Screen, Scroll Lock, and Pause. The uses of these specialty keys varies from system to system. In most systems:
1. Esc can be used to undo commands or actions and in keyboard combinations.
2. Print Screen can be used to copy the current screen contents to the Clipboard, from which you can then Paste the contents into a document for printing (see the Print Screen entry in "Troubleshooting Common Keyboard Problems" later in this chapter).
3. Scroll Lock changes the action of the directional arrow cursors.
Check your user manual to find the details of the specialty keys on your system's keyboard.
Using Special Characters and Symbols
Many documents include characters that don't appear on the keyboard. These special characters include letters from the Greek alphabet, scientific values, symbols for foreign currency, and copyright and registration symbols. Some applications have shortcuts for entering these special characters; Windows 95 provides its own set of special characters in its Character Map accessory. To use the character map, follow these steps:
1. Check to see what font you are using in the document to which you want to add the characters.
2. Click the Windows 95 Start button and choose Programs, Accessories, Character Map.
3. In the Character Map application font list, select the name of the font you're using in your document.
4. Find the character(s) you want to insert in the program document and double-click them. This enters the characters in the Characters to Copy box.
You can select several characters for insertion in your document--all at the same time! The characters that you double-click are shown in the Characters to Copy box.
5. When you have the characters you want to use, click the Copy button.
6. Return to the program that you want to use these in and click the mouse where you want to insert them.
7. Open the Edit menu in that program and choose Paste. This pastes a copy of those characters in the document. You can then cut and copy the individual characters into their appropriate locations in your document.
Typing in Another Language
When you installed Windows, it came with a default language for the keyboard. If you bought your PC or your copy of Windows 95 in the U.S., that language is English (United States). If you need to type in another language, Windows allows you to select another language for the keyboard. To do this, follow these steps:
1. Click the Start menu; choose Settings, Control Panel.
2. Double-click the Keyboard icon in the Control Panel to open the Keyboard Properties dialog box.
3. Click the Language tab so you see the dialog box.
4. Click the Add button to open the Add Language dialog box.
5. Select the new language from the drop-down list and click OK.
This dialog box shows what languages are installed and which one is the default.
Select the language from this list. Some languages (like English) have several varieties.
6. The language is now added. By default, Windows 95 will still use the original language. The dialog box indicates that if you want to switch between languages, you press the Left Alt key and Shift at the same time. By default, Windows will also show you an indicator of which language is being used in the taskbar. When you are done adding languages, click OK.
Hold the mouse pointer over the indicator to see a ToolTip pop up with the full name of the language. Click the indicator to produce a menu with which you can switch between languages.
You can now type in Windows in the new language. But, even with multiple language support, you need to keep in mind a few limitations when selecting a new language for your system:
1. Some languages employ characters not used in English. The font that you use also has to have all of the available characters for that language.
2. Your keyboard still has the U.S. English layout and keys. The foreign language feature is designed with the assumption that users are familiar with the keyboard for the language they've chosen, and the characters are matched to that placement on your current keyboard. If you're unfamiliar with the keyboard for the language you've chosen, you'll just have to type each key and find out which keys type what characters.
3. Finally, not every world language is available. If the language you're seeking doesn't appear in the list, check with Microsoft Technical Support to see if they know a Windows 95-compatible source for the language.
Special Keys for Windows 95
Some keyboards have special keys that perform special tasks in Windows 95. The idea of these keyboards is to give you access to some common mouse functions on the keyboard so that you don't have to take your hands off of the keyboard to perform them. These Windows 95 keyboards usually have three special function keys bringing the total number of keys to 104. These are:
1. The Windows logo keys (there are usually two of these, one each just to the outside of the Alt keys), both marked by the Windows logo
2. The Menu key (usually located between the Windows logo key and the Ctrl key on the right side of the spacebar), marked by a stylized drop-down menu and an arrow pointer
The Windows logo key (referred to as WINDOWS in the following table) performs these actions:
Key Combination Action
WINDOWS Opens the Start menu.
WINDOWS+R Opens the Run dialog box.
WINDOWS+M Minimizes all windows.
Shift+WINDOWS+M Undoes Minimize All.
WINDOWS+F1 Opens Help.
WINDOWS+E Opens Windows Explorer.
WINDOWS+F Opens the Find: All Files dialog box.
Ctrl+WINDOWS+F Opens the Find Computer dialog box.
WINDOWS+Tab Cycles through current taskbar buttons.
WINDOWS+Break Opens System Properties dialog box.
The menu key has one simple application. Select any object and press the menu key and the same pop-up menu that appears when you right-click the mouse on that object appears.
Keeping Your Keyboard Clean and Working
Never spill liquids on your keyboard. Coffee, soda, and other beverage spills can ruin your keyboard. Liquid spills on the keyboard have even been known to cause electrical damage to the PC itself. With that in mind, though you may not stop drinking coffee around your computer, you should at least get a spill-proof mug or keep the coffee on the other side of the desk.
Another enemy of keyboards is static electricity. Static electricity can have the same damaging effect on your keyboard as does liquid. If your keyboard doesn't respond properly after a strong static charge, you may just need to turn off the PC and turn it back on to reset the keyboard. In some cases, however, the static discharge can zap the keyboard and even parts of the PC. If you shuffle your feet across carpet or your PC is in a room with dry air, avoid touching the PC or the keyboard until you have touched something metal to discharge any static. If you don't have a metal desk or bookcase in your work area, consider buying an anti-static mat and keeping it where you can touch it before touching the PC.
Dust, dirt, food crumbs, and hair are other enemies of keyboards. Try to avoid eating over the keyboard and if your computer is in a dirty, dusty area, keep the keyboard covered when not in use.
Some dirt and dust is unavoidable. To keep the keyboard working well, you should occasionally clean it. Any time you clean the keyboard, turn off the PC first; then try any or all of these three techniques for cleaning the keyboard:
1. Turn it upside down and shake it. This should shake loose some of the crumbs and dirt that collect between the keys.
2. Get a can of compressed air (available for a few dollars at most PC or electronics stores) and use it to blow the dirt and dust from between the keys. Be sure to read the directions on the can before using it. If you hold the can wrong or use it incorrectly, you may blow cold liquid into the keyboard instead of air. Generally, you need to hold the can upright and tip the keyboard up at an angle so the debris will fall out when it is blown loose.
3. If the keys themselves are dirty or sticky, wet a cleaning rag with some rubbing alcohol or a little bit of any non-abrasive household cleaner (something like Windex or Formula 409 is fine) and use it to clean the keys. Don't spray or pour any cleaner directly on the keyboard, and don't get the rag dripping wet.
Avoiding Keyboard-Related Injuries
Carpal tunnel syndrome, tendonitis, and other repetitive stress injuries have become serious health problems for many computer users. If you will use your computer a lot, you should know how to avoid these injuries and what the symptoms are.
First, if you feel any pain after typing or using the PC for extended periods, consult a physician immediately. Symptoms can include:
1. Pain in the wrists
2. Numbness or tingling of fingers
To avoid this type of injury, you need to use the proper posture and position of the body while typing. Always sit with your back straight. Your shoulders should be relaxed, and your upper arms should hang almost straight down.
At this point, adjust your chair and desk so that your forearms are parallel to the floor and your hands are just above the keyboard. Don't rest your wrists on the desk or the keyboard.
While typing, your knuckles, wrists, and forearms should form a straight line. While a lot of people have started using wrist pads to rest their wrists on while typing, you should know that these generally don't keep your hands and arms aligned correctly.
If you type for hours on end, you should stop and take a break for just a few seconds every few minutes. This is even more important for touch typists whose actions are probably more repetitive than those who "hunt and peck."
Beyond these issues, you may want to consider investing in a special ergonomic keyboard. The Microsoft Natural keyboard and several others like it are specially designed to reduce the risk of this type of injury. These keyboards are generally split down the middle and angled to allow your arms and wrists to rest in the proper alignment. If you think you want to try one of these keyboards, find a store with one set up in a display where you can sit down and try the keyboard. Many computer professionals who work constantly at their PCs won't use anything but one of these special keyboards.
Troubleshooting Common Keyboard Problems
The following tips may help you diagnose (and perhaps resolve) some of the most common keyboard problems.
Keys Type Odd Symbols or Letters
To solve this dilemma, do any of the following:
1. See the section "Using Special Characters and Symbols" earlier in this chapter, and be sure that the language selected in Windows 95 is English (United States) or whatever language you want the keyboard to be typing in.
2. Check the font selection in your application to be sure that you haven't selected a symbol font like WingDings or Symbol. Try selecting Times or Arial and see if the problem is fixed.
3. If the problem happens only occasionally and only with a few keys, the keyboard itself may be bad. Borrow a keyboard from a friend or buy a cheap spare at the store. Plug it in and see if it works. If you get the same problem, your problem may be in the PC itself, not the keyboard, and the PC will require professional service.
Print Screen Key Doesn't Work
In Windows 95, the Print Screen key doesn't print to the printer. What it does do is copy the screen to the Clipboard. To print a screen, press the Print Screen key to copy what you want to print. Next, click the Start menu and choose Programs, Accessories, Paint. In Paint, click the Edit menu and choose Paste. You now have a Paint picture of your screen. Click the File menu and choose Print. You can save the Paint picture if you want to save the picture of your screen.
Arrow Keys Type Numbers Instead of Moving the Cursor/Number Keys Move the Cursor
Look for the light that indicates the Num Lock on your keyboard. When this is lit, the numeric keyboard is in number mode and is used like a 10-key calculator. When the light is off, the numeric keypad is used for the arrow key movements indicated on the keys.
The Keyboard (or PC) Won't Stop Beeping
There's a key stuck somewhere. If there is an application running, look to see if the same letter or number is filling the screen. The key may be jammed, broken, or so dirty underneath that the contact is jammed shut. Try cleaning the keyboard and restarting the PC.
I Get a Message That Says Keyboard error or Keyboard missing When the PC Boots Up and Then Nothing Happens
Try any of the following:
1. Check first to be sure that the keyboard is plugged in correctly.
2. Your keyboard and mouse may have similar plugs and connectors. Check for an icon on the computer case or a description in the computer manual showing which plug is the correct one for the keyboard, and be sure it is in the right plug.
3. Turn off all power to the PC, waiting a few minutes, and restarting it.
4. Borrow a keyboard from a friend or buy a cheap spare at the store. Plug it in and see if it works. If you get the same error, your problem is in the PC itself-- not the keyboard-- and the PC will require professional service.
Scanners

Defining Scanner Types
Scanners are peripheral devices used to digitize (convert to electronic format) artwork, photographs, text, or other items from hard copy. In a sense, a scanner works as a pair of eyes for your PC. Your eyes see an image and translate the image into electrical impulses that travel to and are interpreted by your brain. Similarly, a scanner captures images and converts them to digital data that travel to and are interpreted by the computer.
A scanner works by dividing an image into microscopic rows and columns and measuring, like the film in a camera, how much light (or lack thereof) reflects from each individual intersection of the rows and columns. Each reflection is recorded as a dot, or picture element (pixel). After the scanner collects information from each dot, it compiles the result into a digital file on the computer.
There are a wide variety of scanners that work in a number of different ways, but the technology behind them is essentially the same. The following sections discuss the more popular types of scanners available today.
Flatbed Scanners
Flatbed scanners look and behave a lot like a photocopier. You lay the item to be scanned on a glass plate and the scanning head passes below the glass.
Flatbed scanners are very versatile: you can scan objects in a variety of sizes and shapes, including pages from a book, without damaging the original. While flatbed scanners are the best choice for a wide variety of uses, if you plan to do a lot of text scanning (called OCR for Optical Character Recognition) work, keep in mind that flatbeds only accommodate one page at a time. Scanning multi-page documents can be a slow, tedious process, because you have to manually remove one page and insert the next.
Sheetfed Scanners
Sheetfed scanners look and act more like fax machines. The page or item is fed into the machine, scanned, then spit out on the other end . A sheetfed scanner is a good choice for large volumes of text, but not for handling delicate original photographs. Scanning directly from a book or other three-dimensional object is impossible.
Hand Scanners
Hand scanners are a low-cost alternative to their larger, more sophisticated cousins. As their name implies, hand scanners are manual devices you move over a flat surface, just as you do your PC's mouse
The hand scanner's advantages are many, but so are its disadvantages. Generally, hand scanners work best for small, uncomplicated images such as company logos or small black-and-white photographs. You might want a hand scanner if you don't plan to use it on a regular basis, because it usually doesn't require adding internal cards to your CPU, and it's easily disconnected and stored away. Most hand scanners can only scan a four-inch wide image at one time and require a steady hand. You're usually provided with software that helps you "sew up" a series of these 4-inch, side-by-side scans into one image, but this is obviously not as convenient as getting the full image at once.
Color versus Grayscale Scanners
Scanners that can scan images in full color have become much more popular as their prices have dropped. Just a few years ago, color scanners cost several thousands of dollars, but can now be bought for a few hundred, depending on resolution and type.
Even so, grayscale (meaning shades of black and white only, no color) scanners are still available and are significantly cheaper. In many cases, they are perfectly adequate for the average user. Unless you have a color printer, or use your scanner to create artwork that will only be viewed on-screen (such as for a Web page), there's no point in having a color scanner. Consider this carefully before buying; however, what you think you'll never do now could change as you grow more experienced and interested in computer technology.
Understanding Resolution and Dots Per Inch
Like printers, the technical capability (optical resolution) of a scanner is measured in dots per inch (dpi). The higher the dpi, the sharper your on-screen printable image will be. The reason for this is that the more dots that can be placed in the same area (in this case, one square inch), the smoother and more detailed the overall image will look.
On the other hand, the higher its resolution, the longer the scanner takes to scan the image, and the larger the resulting image's data file will be (more dots equals more information; more information equals a larger file). Typical flatbed scanners range from 300 dpi to more than 3,200 dpi; The most affordable resolution for the average consumer is 1,200-1,600 dpi.
System Requirements
Before you buy or try to install a scanner, make sure that your computer can actually run it. Scanners can really stretch the limits of a mid-range PC--and may not work at all on low-end ones. Carefully review the manufacturer's stated system requirements and verify that your system has at least the minimum amount of RAM, CPU speed, and hard drive space listed. For best results, exceed the minimum requirements by as much as possible. Most manufacturers require nothing less than a 486/33 processor (if you have a Pentium or better, you should be safe). Most experts recommend a minimum of 16-24M of RAM even if the manufacturer claims less.
Connecting a Scanner to Your PC
Like all peripheral devices, your scanner must be connected to your computer in some way. Most likely, your scanner came with all the equipment required to hook it up.
SCSI Cards and Cables
The vast majority of flatbed and sheetfed scanners use SCSI (Small Computer System Interface, pronounced "skuzzy") connections. If you're lucky, your computer already has a SCSI card installed and all you'll have to do is connect the provided cable to the SCSI port at the back of your computer. But most computers don't come that way, so you might need to open the system case and install a new card in one of your computer's expansion slots. If so, follow the instructions that came with the scanner, and check your computer system's manual to make sure you're installing it in the right place. See Chapter 27, "Upgrading Your Hardware," for details on how to install add-in cards.
The great thing about SCSI devices is that one SCSI card can support up to seven different devices connected together in a "SCSI chain." You might, for example, have a scanner plugged into the SCSI port, a Jaz drive connected to the scanner, an external hard drive connected to the Jaz drive, and a CD-ROM drive connected to the external hard drive. Not only does this give you more flexibility in configuring your system, it also saves the few expansion ports in your computer for other devices that aren't able to share.
TWAIN Drivers
Every hardware device, whether internal or external, requires a software program called a driver to help it communicate with your computer's operating system. For scanners, the standard driver type is a TWAIN driver (supposedly, TWAIN stands for Technology Without An Interesting Name). By using TWAIN drivers, scanners can communicate with any TWAIN-compatible applications. Most of today's popular drawing and graphics applications such as CorelDRAW!, Paint Shop Pro, Adobe Photoshop, and even Microsoft Office 97 all support TWAIN, and thus use very similar steps, buttons, and the like. You don't have to learn a different method for every application you scan from. (If you're not sure, check the application's File menu for an item labeled Acquire, or look in the manual.)
Getting Windows 95 to Recognize Your Scanner
After you've made the physical connections, install the TWAIN driver according to the instructions that came with the scanner. If instructions for using the scanner under Windows 95 are not included, follow these steps:
1. Shut down the computer and wait 30 seconds. Power up the scanner, wait 10-15 seconds, then reboot your PC.
2. From the Start menu, choose Settings, Control Panel. When the Control Panel window opens, double-click Add New Hardware.
3. Click Next. The wizard will ask if you want Windows 95 to search for your new hardware; choose No and click Next again
4. At the next screen, click Other Devices from the list of items click Next again.
5. Look through the Manufacturers list and the Models list. If you find your scanner (you probably won't), click Next. If not, click Have Disk.
6. In the Install from Disk dialog box, show the wizard where your install program is (usually on a floppy disk that came with the scanner), either by typing in the path name or clicking the Browse button and navigating to the proper location. Click Next twice.
7. When you get to the final wizard screen, click Finish. Windows will continue the setup process, and may ask you for your Windows 95 CD-ROM.
8. When the setup process is complete, restart your computer by choosing Shut Down from the Start menu, then choosing Restart the Computer?.
9. As Windows 95 restarts, you may notice a message on the screen indicating it has found a new device and is installing drivers for it, or other similar messages. Respond and follow any directions if necessary.
10. To confirm that Windows has found and set up your scanner, double-click the System icon in the Control Panel folder.
11. Click the Device Manager tab, and look for the Other devices entry on the list of devices. Click the + next to Other devices; your scanner should be listed. Click OK to clear the dialog box. Your scanner is now ready to use.
Scanning a Document
Most scanners come with some kind of image-editing software such as Adobe Photoshop or Photoshop LE. Even if not, there are some excellent programs available for a relatively inexpensive price--some you can even download from the Internet, such as Paint Shop Pro or Graphics Workshop.
If the program is TWAIN-compliant, its scanning features will work about the same no matter which program you choose. The main differences will come from the TWAIN driver supplied by your scanner's manufacturer. You'll want to review the program's documentation or check its online Help system to learn exactly how to use that particular program.
Regardless of the program, the general tips and techniques that follow will help you produce better scans and get the most out of your image-editing software:
1. Always keep the glass on your flatbed scanner clean and free of smudges and fingerprints. Be sure to use special lens-cleaning cloths, not household tissues or paper towels--these can permanently scratch your scanner's glass. You can get lens-cleaning cloths at most computer or office supply stores.
2. If you have to move your flatbed scanner, make sure you lock the scanning head in place first. If you don't, it can become dislodged from its track and be costly to repair. If the locking mechanism isn't obvious, check the scanner's documentation for help.
3. Know the desired result before you scan. How will the image be used--for a letterhead? On a Web page? In a newsletter? Different jobs require different approaches, so plan ahead.
4. Use the lowest resolution possible that will still provide the quality you want. "Overscanning" only serves to make larger files and slower scans.
5. Scan photographs at about twice the resolution of the expected output. If you're not sure what that will be, ask your print shop. Magazines are traditionally printed at 133 lines per inch (lpi), so scan the photo at 266 dpi.
6. For line art images (hand-drawn artwork, mechanical drawings, and so on), always use the highest resolution possible.
7. Don't overscan an image if it's only going to a laser or inkjet printer. Laser printers generally output at about 50 or 100 lpi, so a simple 200 dpi scan will do just fine.
8. Images intended only for on-screen viewing need even less: 80 to 100 dpi is adequate.
9. For OCR (see the next section), use 300-400 dpi.
10. Get to know your image-editing software. Experiment with the various filters and effects you can apply to your scanned images--they can make all the difference in the world. If you're really interested in mastering image editing or you need to learn a lot quickly, consider taking a class or buying a book especially on that software program. Inside Adobe Photoshop from New Riders Publishing would be one recommendation. An edition of the book is available for each of the two current releases (3 and 4).
OCR Software
Using OCR, scanners can also be used to convert hardcopy text to a text file you can then edit in your word processor, saving hours of retyping. In addition to stand-alone programs like IBM's TextBridge, many of the better fax/modem software programs such as Delrina WinFax PRO also include OCR capability.
Keep in mind that while most OCR programs have a 95 percent or higher accuracy rate, they are not perfect. For best results, you need to start with a clean hard copy (preferably on white paper), in a simple typeface, such as that produced by a typewriter. Handwritten words, unless very neatly printed, usually don't translate very well. If your original is messy, or the print is too small or fancy for the scanner to read easily, you might end up spending as much time cleaning up the scanned text as you would retyping it after all.
RAM - Random Access Memory
Due to cost considerations, all but the very high-end (and very expensive) computers have utilized DRAM for main memory. Originally, these were asynchronous, single-bank designs because the processors were relatively slow. Most recently, synchronous interfaces have been produced with many advanced features. Though these high-performance DRAMs have been available for only a few years, it is apparent that they will soon be replaced by at least one of the protocol-based designs, such as SyncLink or the DRDRAM design from Rambus, Inc. and Intel.
Basic DRAM operation
A DRAM memory array can be thought of as a table of cells. These cells are comprised of capacitors, and contain one or more ‘bits’ of data, depending upon the chip configuration. This table is addressed via row and column decoders, which in turn receive their signals from the RAS and CAS clock generators. In order to minimize the package size, the row and column addresses are multiplexed into row and column address buffers. For example, if there are 11 address lines, there will be 11 row and 11 column address buffers. Access transistors called ‘sense amps’ are connected to the each column and provide the read and restore operations of the chip. Since the cells are capacitors that discharge for each read operation, the sense amp must restore the data before the end of the access cycle.
The capacitors used for data cells tend to bleed off their charge, and therefore require a periodic refresh cycle or data will be lost. A refresh controller determines the time between refresh cycles, and a refresh counter ensures that the entire array (all rows) are refreshed. Of course, this means that some cycles are used for refresh operations, and has some impact on performance.
A typical memory access would occur as follows. First, the row address bits are placed onto the address pins. After a period of time the RAS\ signal falls, which activates the sense amps and causes the row address to be latched into the row address buffer. When the RAS\ signal stabilizes, the selected row is transferred onto the sense amps. Next, the column address bits are set up, and then latched into the column address buffer when CAS\ falls, at which time the output buffer is also turned on. When CAS\ stabilizes, the selected sense amp feeds its data onto the output buffer.
Page Mode Access
By implementing special access modes, designers were able to eliminate some of the internal operations for certain types of access. The first significant implementation was called Page Mode access.
Using this method, the RAS\ signal is held active so that an entire ‘page’ of data is held on the sense amps. New column addresses can then be repeatedly clocked in only by cycling CAS\. This provides much faster random access reads, since the row address setup and hold times are eliminated.
While some applications benefit greatly from this type of access, there are others that do not benefit at all. The original Page Mode was improved upon and replaced very quickly so you will likely never see any memory of this type. Even if you do, it wouldn’t be worth even getting it for free, considering the advantages of later access modes.
Fast Page Mode
Fast Page mode improved upon the original page mode by eliminating the column address setup time during the page cycle. This was accomplished by activating the column address buffers on the falling edge of RAS\ (rather than CAS\). Since RAS\ remains low for the entire page cycle, this acts as a transparent latch when CAS\ is high, and allows address setup to occur as soon as the column address is valid, rather than waiting for CAS\ to fall.
Fast Page mode became the most widely used access method for DRAMs, and is still used on many systems. The benefit of FPM memory is reduced power consumption, mainly because sense and restore current is not necessary during page mode access. Though FPM was a major innovation, there are still some drawbacks. The most significant is that the output buffers turn off when CAS\ goes high. The minimum cycle time is 5ns before the output buffers turn off, which essentially adds at least 5ns to the cycle time.
Today, FPM memory is the least desirable of all available DRAM memory. You should only consider using this if it is either free, or your system does not support any of the later memory types (such as a 486 based system). Typical timings are 6-3-3-3 (initial latency of 3 clocks, with a 3-clock page access). Due to the limited demand, FPM is actually more expensive now than most of the faster memories now available.
HyperPage Mode (EDO)
The last major improvement to asynchronous DRAMs came with the Hyperpage mode, or Extended DataOut. This innovation was simply to no longer turn off the output buffers upon the rising edge of /CAS. In essence, this eliminates the column precharge time while latching the data out. This allows the minimum time for /CAS to be low to be reduced, and the rising edge can come earlier.
In addition to a 40% or greater improvement in access times, EDO uses the same amount of silicon and the same package size. EDO has been shown to work well with memory bus speeds up to 83MHz with little or no performance penalty. If the chips are sufficiently fast (55ns or faster), EDO can be used even with a 100MHz memory bus. One of the best reasons to use EDO is that all of the current motherboard chipsets support it with no compatibility problems, unlike much of the synchronous memory now being used.
Even with all the stated advantages, EDO is no longer considered mainstream. Most manufacturers no longer produce it, or have limited production. It is only a matter of time before the prices begin to rise, and the equivalent size SDRAM module will be less expensive.
If you already own EDO memory, there is no real reason to jump to SDRAM unless you require bus speeds above 83MHz. With a typical EDO timing of 5-2-2-2 at 66MHz, there is almost no noticeable improvement with SDRAM over EDO, and at 83MHz it is still negligible. If you require 100MHz bus operation, EDO will lag far behind current SDRAM in performance even if it does operate at that speed due to the need for 6-3-3-3 timings. On the other hand, with EDO being phased out, you will likely find SDRAM to be equal to or even lower in price.
Burst EDO (BEDO)
Burst EDO, while a good idea, was dead before it ever was born. The addition of a burst mode, along with a dual bank architecture would have provided the 4-1-1-1 access times at 66MHz that many expected with SDRAM. Burst mode is an advancement over page mode, in that after the first address input, the next 3 addresses are generated internally, thereby eliminating the time necessary to input a new column address. Unfortunately, Intel decided that EDO was no longer viable, and SDRAM was their preferred memory architecture so they did not implement support of BEDO into their chipsets. In fact, several large memory manufacturers had put considerable time and money into the development of SDRAM over the past decade, and were not very happy with the BEDO design.
Except for support of bus speeds of 100MHz and faster, BEDO would probably have been a much faster and more stable memory than SDRAM. Essentially, BEDO lost support as much for political and economic reasons as for technical ones, it seems.
Synchronous Operation
Once it became apparent that bus speeds would need to run faster than 66MHz, DRAM designers needed to find a way to overcome the significant latency issues that still existed. By implementing a synchronous interface, they were able to do this and gain some additional advantages as well.
With an asynchronous interface, the processor must wait idly for the DRAM to complete its internal operations, which typically takes about 60ns. With synchronous control, the DRAM latches information from the processor under control of the system clock. These latches store the addresses, data and control signals, which allows the processor to handle other tasks. After a specific number of clock cycles the data becomes available and the processor can read it from the output lines.
Another advantage of a synchronous interface is that the system clock is the only timing edge that needs to be provided to the DRAM. This eliminates the need for multiple timing strobes to be propagated. The inputs are simplified as well, since the control signals, addresses and data can all be latched in without the processor monitoring setup and hold timings. Similar benefits are realized for output operations as well.
JEDEC SDRAM
All DRAMs that have a synchronous interface are known generically as SDRAM. This includes CDRAM (Cache DRAM), RDRAM (Rambus DRAM), ESDRAM (Enhanced SDRAM) and others, however the type that most often is called SDRAM is the JEDEC standard synchronous DRAM.
JEDEC SDRAM not only has a synchronous interface controlled by the system clock, it also includes a dual-bank architecture and burst mode (1-bit, 2-bit, 4-bit, 8-bit and full page). A ‘mode register’ that can be set at power-on and changed during operation controls the burst mode, burst type (sequential or interleave), burst length and CAS latency (1, 2 or 3).
CAS Latency is one of several performance related timings for SDRAM. This measurement is the time it takes to strobe in the Row Address, and to activate the bank. When a burst read cycle is initiated, the addresses are set up and RAS\ and CS\ (chip select) are held low on the next clock cycle (rising edge of CLK), thereby activating the sense amplifiers on the bank. A period of time equal to tRCD (RAS\ to CAS\ delay) must pass after which CAS\ and CS\ are held low (again, at the next clock cycle). After the time period for tCAC (column access time) has passed the first bit of data is on the output line and can be retrieved (at the next clock cycle). The basic rule is that CAS latency times the clock speed (tCLK) must be equal or greater than tCAC (or CL x tCLK >= tCAC). This means that the column access time is the limiting factor for CAS Latency.
SDRAM was initially introduced as the answer to all performance problems, however it quickly became apparent that there was little performance benefit and a lot of compatibility problems. The first SDRAM modules contained only two clock lines, but it was soon determined that this was insufficient. This created two different module designs (2-clock and 4-clock), and you needed to know which your motherboard required. Though the timings were theoretically supposed to be 5-1-1-1 @ 66MHz, many of the original SDRAM would only run at 6-2-2-2 when run in pairs, mostly because the chipsets (i430VX, SiS5571) had trouble with the speed and coordinating the accesses between modules. The i430TX chipset and later non-Intel chipsets improved upon this, and the SPD chip (serial presence detect) was added to the standard so chipsets could read the timings from the module. Unfortunately, for quite some time the SPD EEPROM was either not included on many modules, or not read by the motherboards.
SDRAM chips are officially rated in MHz, rather than nanoseconds (ns) so that there is a common denominator between the bus speed and the chip speed. This speed is determined by dividing 1 second (1 billion ns) by the output speed of the chip. For example a 67MHz SDRAM chip is rated as 15ns. Note that this nanosecond rating is not measuring the same timing as an asynchronous DRAM chip. Remember, internally all DRAM operates in a very similar manner, and most performance gains are achieved by ‘hiding’ the internal operations in various ways.
The original SDRAM modules either used 83MHz chips (12ns) or 100MHz chips (10ns), however these were only rated for 66MHz bus operation. Due to some of the delays introduced when having to deal with the various synchronization of signals, the 100MHz chips will produce a module that operates reliably at about 83MHz, in many cases. These SDRAM modules are now called PC66, to differentiate them from those conforming to Intel’s PC100 specification.
PC100 SDRAM
When Intel decided to officially implement a 100MHz system bus speed, they understood that most of the SDRAM modules available at that time would not operate properly above 83MHz. In order to bring some semblance of order to the marketplace, Intel introduced the PC100 specification as a guideline to manufacturers for building modules that would function properly on their upcoming i440BX. With the PC100 specification, Intel laid out a number of guidelines for trace lengths, trace widths and spacing, number of PCB layers, EEPROM programming specs, etc.
There is still quite a bit of confusion regarding what a ‘true’ PC100 module actually consists of. Unfortunately, there are quite a few modules being sold today as PC100, yet do not operate reliably at 100MHz. While the chip speed rating is used most often to determine the overall performance of the chip, a number of other timings are very important. tRCD (RAS to CAS Delay), tRP (RAS precharge time) and CAS Latency all play a role in determining the fastest bus speed the module will operate on to still achieve a 4-1-1-1 timing.
PC100 SDRAM on a 100MHz (or faster) system bus will provide a performance boost for Socket 7 systems of between 10% and 15%, since the L2 cache is running at system bus speed. Pentium II systems will not see as big a boost, because the L2 cache is running at ½ processor speed anyway, with the exception of the cacheless Celeron chips of course.
DDR SDRAM
One limitation of JEDEC SDRAM is that the theoretical limitation of the design is 125MHz, though technology advances may allow up to 133MHz operation. It is obvious that bus speeds will need to increase well beyond that in order for memory bandwidth to keep up with future processors. There are several competing new standards on the horizon that are very promising, however most of them require special pinouts, smaller bus widths, or other design considerations. In the short term, Double Data Rate SDRAM looks very appealing. Essentially, this design allows the activation of output operations on the chip to occur on both the rising and falling edge of the clock. Currently, only the rising edge signals an event to occur, so the DDR SDRAM design can effectively double the speed of operation up to at least 200MHz.
There is already one Socket 7 chipset that has support for DDR SDRAM, and more will certainly follow if manufacturers decide to make this memory available. In this industry, many times it is the first to market that gains the support, rather than the best technology.
Enhanced SDRAM (ESDRAM)
In order to overcome some of the inherent latency problems with standard DRAM memory modules, several manufacturers have included a small amount of SRAM directly into the chip, effectively creating an on-chip cache. One such design that is gaining some attention is ESDRAM from Ramtron International Corporation.
ESDRAM is essentially SDRAM, plus a small amount of SRAM cache which allows for lower latency times and burst operations up to 200MHz. Just as with external cache memory, the goal of a cache DRAM is to hold the most frequently used data in the SRAM cache to minimize accesses to the slower DRAM. One advantage to the on-chip SRAM is that a wider bus can be used between the SRAM and DRAM, effectively increasing the bandwidth and increasing the speed of the DRAM even when there is a cache miss.
As with DDR SDRAM, there is currently at least one Socket 7 chipset with support for ESDRAM. The deciding factor in determining which of these solutions will succeed will likely be the initial cost of the modules. Current estimates show the cost of ESDRAM at about 4 times that of existing DRAM solutions, which will likely not go over well with most users.
Protocol Based DRAM
All of the previously discussed DRAM have separate address, data and control lines which limits the speed at which the device can operate with current technology. In order to overcome this limitation, several designs implement all of these signals on the same bus. The two protocol based designs currently getting the most attention are SyncLink DRAM (now called SLDRAM due to trademark issues) and Direct Rambus DRAM (DRDRAM) licensed by Rambus, Inc.
DRDRAM
Intel has placed their money on the proprietary memory design developed by Rambus, Inc. On the surface, this looks to be a very fast solution for system memory due to its fast operation (up to 800MHz). The reality is, however, that the design is only up to twice as fast as current SDRAM operation due to the smaller bus width (16 bits vs. 64 bits).
Despite the claims from Intel and Rambus, Inc., there are some potentially serious issues which need to be addressed with this technology. The higher speeds require short wire lengths and additional shielding to prevent problems with EMI. In addition, latency times are actually worse than currently available fast SDRAM. Since most of today’s applications do not actually utilize the full bandwidth of the memory bus even today, simply increasing the bandwidth while ignoring latency issues will likely not provide any real performance improvements. In addition, processors operating with 800MHz bus speeds will certainly require more than double the current memory bandwidth.
While these issues are serious enough, the biggest drawback to the technology is that it is proprietary technology. Manufacturers wishing to implement a solution with DRDRAM will be required to pay a royalty to Intel and Rambus, Inc., and will also have no real control over the technology. This is not an attractive outlook for most memory manufacturers who have no desire to essentially become chip foundries.
SLDRAM
Many memory manufacturers are putting their support behind SLDRAM as the long-term solution for system performance. While SLDRAM is a protocol-based design, just as RDRAM is, it is an open-industry-standard, which requires no royalty payments. This alone should allow for lower cost. Another cost advantage for the SLDRAM design is that it does not require a redesign of the RAM chips.
Due to the use of packets for address, data and control signals, SLDRAM can operate on a faster bus than standard SDRAM – up to at least 200MHz. Just as DDR SDRAM operates the output signal at twice the clock rate, so can SLDRAM. This puts the output operation as high as 400MHz, with some engineers claiming it can reach 800MHz in the near future.
Compared to DRDRAM, it seems that SLDRAM is a much better solution due to the lower actual clock speed (reducing signal problems), lower latency timings and lower cost due to the royalty-free design and operation on current bus designs. It appears that even the bandwidth of SLDRAM is much higher than DRDRAM at 3.2GB/s vs. 1.6GB/s
Though Intel initially intended to support only DRDRAM in future chipsets, competing chipset manufacturers, memory manufacturers and pressure from end users may force them to include support for SLDRAM as well. If the marketplace can successfully influence Intel to provide this support, we may actually see a situation where the best technology wins over marketing hype.
Motherboard
The motherboard is the foundation of any PC. All the critical subsystems, including the CPU, system chipset, memory, system I/O, expansion bus, and other critical components run directly off the motherboard. Likewise, the interconnections among these components are laid into the motherboard itself.
The mainboard is possibly the most important part of the computer. It manages all transactions of data between CPU and the peripherals. It houses the CPU and its second level cache, the chipset, the BIOS, main memory, I/O chips, ports for keyboard, serial I/O, parallel I/O ,disks and plug-in cards.
The first decision you have to make before buying a motherboard is nowadays which CPU and then which chipset you're gonna use and which motherboard to choose. There's no doubt about it - you really should go for a brand motherboard, preferably a brand that's present on the web, because that is by far the best way to get the latest Flash BIOS update, drivers and information about the board you might require.
Add-Ons
It is becoming pretty common to use a few more cards in your system than only a graphics card. A gaming system without a modem, ISDN or network card is certainly not worth being called a gaming system anymore, simply due to the fact that the only real gaming experience is generated by multiplayer games, my beloved Quake II is only one of many many others. Hence it's not out of the world if I expect that any network card should work flawlessly in any motherboard.
People who buy expensive Pentium III systems are certainly making a smart move when investing in SCSI rather than EIDE. SCSI still offers the highest disk performance, a great upgradeability for e.g. CDROMs, CD-recorders, scanners, streamers, ... and last but not least a very low trouble level. Thus I do appreciate if motherboards that are targeted towards expensive high end systems have got a SCSI adapter already onboard, a RAIDport is even better, and it's almost perfect if it's even Adaptec's latest U2W SCSI adapter, as e.g. on DFI's new BX board. The least I would expect however, is that any SCSI adapter runs flawlessly in any board.
A sound system is nowadays a basic component of any PC. Thus I'd appreciate if there's either a decent sound system onboard or the board works fine with older ISA soundcards as well as the new PCI soundcards. In case of the latter it's useful having the new 'SBLink' onboard, which enables compatibility to the old ISA Soundblaster standard.
All in all do I think it's not really asked too much that a modern motherboard can host all these components together at the same time. If it doesn't, it may be as fast as it wants, it will still be pretty useless for any home or office user, system integrator or OEM.
Stability
Another requirement of a motherboard is certainly the stability. In the most cases boards become instable when they cannot work properly with the RAM that's plugged in. As we are fast moving towards the 100 MHz system bus as a standard, memory problems will become a lot more common. It can easily be that a board only works reliably with RAM of only a few memory vendors, other boards were designed and tested better, so that you can throw virtually any memory at it, as long as it applies to the basic specifcations.
One way of testing this out is of course overclocking. If the board is running stable at a higher system bus than what it was designed for, it will most likely be rock stable at the specified system clock. However, testing a board to the limits is very difficult, because no board manufacturer and neither any CPU manufacturer would tell you which instructions are most sensitive to timing problems and overclocking.
So it's virtually impossible saying that a board or a CPU run absolutely stable at a particular clock speed, because it is very likely that the really touchy procedures haven't been ran at all. This means for the reader that you of course can be lucky as long as you are not using these procedures on your system, but it could as well be that you are using particularly the very software that will cause a crash in a board that was testified as stable.
Summary
Finally, the features of a board should be pointed out as well. I already mentioned onboard SCSI, network adapter and sound, but there are other things too. System monitoring can be an issue for people and it's certainly not wrong if a board is equipped with it. It can tell you if your fan stopped working, if your power supply fails or if your CPU gets too hot.
The new wake up features maybe worth a look at too, because it can save you from leaving your system running permanently, thus saving energy. Wake up on ring, on LAN and also on clock are features that I do appreciate. These features are used best in combination with the 'suspend to disk' feature, as well known from notebooks. AOpen is one of the few manufacturers who have this feature implememted into their boards for more than a year now. It starts your system exactly the same way you left it. The same programs are running, the same data is still there.
The above said leads to the following new evaluation scheme for motherboards in exactly this order:
1. Compatibility and Reliability (AGP, PCI, ISA cards, BIOS, RAM)
2. Features (onboard features)
3. Performance (office performance and gaming performance)
Computer Busses - various types
Bus Types
The expansion bus (where expansion cards go) is an extension of the Central Processor, so when adding cards to it, you are extending the capabilities of the CPU itself. The relevance of this regard to the BIOS is that older cards are less able to cope with modern buses running at higher speeds than the original design of 8 or so MHz. Also, when the bus is accessed, the whole computer slows down to the bus speed, so it's often worth altering the speed of the bus or the wait states between it and the CPU to speed things up. The PC actually has four buses; the processor bus connects the CPU to its support chips, the memory bus connects it to its memory, the address bus is part of both of them, and the I/O (or expansion) bus is what concerns us here.
ISA
Industry Standard Architecture. The 8-bit version cane on the original PC and the AT, but the latter uses an extension to make it 16-bit. It has a maximum data transfer rate of about 8 megabits per second on an AT, which is actually well above the capability of disk drives, or most network and video cards. The average data throughput is around a quarter of that. Its design makes it difficult to mix 8- and 16-bit RAM or ROM within the same 128K block of upper memory; an 8-bit VGA card could force all other cards in the same (C000-DFFF) range to use 8 bits as well, which was a common source of inexplicable crashes where 16-bit network card were involved.
EISA
Extended Industry Standard Architecture. An evolution of ISA and (theoretically) backward compatible with it, including the speed (8 MHz), so the increased data throughput is mainly due to the bus doubling in size-but you must use EISA expansion cards. It has its own DMA arrangements, which can use the complete address space. On advantage of EISA (and Micro Channel) is the ease of setting up expansion cards-plus them in and run the configuration software which will automatically detect their settings.
MCA
Micro Channel Architecture. A proprietary standard established by IBM to take over from ISA, and therefore incompatible with anything else. It comes in two versions, 16- and 32-bit and, in practical terms, is capable of transferring around 20 mbps.
Local Bus
The local bus is one more directly suited to the CPU; it's next door (hence local), has the same bandwidth and runs at the same speed, so the bottleneck is less (ISA was local in the early days). Data is therefore moved along the bus at processor speeds. There are two varieties:
VL-BUS, a 32-bit bus which allows bus mastering, and uses two cycles to transfers a 32-bit word, peaking at 66 Mb/sec. It also supports burst mode, where a single address cycle precedes four data cycles, meaning that 4 32-bit words can move in only 5 cycles, as opposed to 8, giving 105 Mb/sec at 33 MHz. The speed is mainly obtained by allowing VL-Bus adapter cards first choice at intercepting CPU cycles. It's not designed to cope with more than a certain number of cards at particular speeds; e.g. 3 at 33, 2 at 40 and only 1 at 50 MHz, and even that often needs a wait state inserted. VL-Bus 2 is 64-bit, yielding 320 Mb/sec at 50 MHz. There are two types of slot; Master and Slave. Master boards (e.g. SCSI controllers) have their own CPUs which can do their own things; slaves (i.e. video cards) don't. A salve board will work on a master slot, but not vice versa.
PCI, which is a mezzanine bus, divorced from the CPU, giving it some independence and the ability to cope with more devices, so it's more suited to cross-platform work. It is time multiplexed, meaning that address and data lines share connections. It has its own burst mode that allows 1 address cycle to be followed by as many data cycles as system overheads allow. At nearly 1 word per cycle, the potential is 264 Mb/sec. It can operate up to 33 MHz, or 66 MHz with PCI 2.1 and can transfer data at 32 bits per clock cycle so you can get up to 132 Mbytes/sec (264 with 2.1). Each PCI card can perform up to 8 functions, and you can have more than one busmastering card on the bus. It should be noted, though, that many functions are not available with PCI, such as sound. Not yet, anyway. It is part of the plug and play standard, assuming your operating system and BIOS agree, so it is auto configuring (although some cards use jumpers instead of storing information in a chip); it will also share interrupts under the same circumstances. The PCI chipset handles transactions between cards and the rest of the system, and allows other buses to be bridged to it (typically and ISA bus to allow older cards to be used). Not all of them are equal, though; certain features, such as byte merging, may be absent. The connector may vary according to the voltage the card uses (3.3 or 5v; some cards can cope with both).
Subscribe to:
Posts (Atom)
